

Balanced Price Range (BPR) Explained: How to Identify and Trade It
A Balanced Price Range (BPR) is the overlapping zone between two opposing fair value gaps. Learn how to identify bullish and bearish BPRs and use them as high-probability trade entries.

A Balanced Price Range (BPR) is the overlapping zone where a bullish fair value gap and a bearish fair value gap intersect. Because the zone has been tested from both sides, it represents an area where price is balanced: the imbalance from each individual gap has been partially resolved, making the overlap a high-confluence entry zone on pullbacks.
What Is a Balanced Price Range (BPR)?
Fair value gaps (FVGs) represent price imbalances: areas where the market moved so fast that one side of the order book was not fully filled. When a bullish FVG and a bearish FVG overlap, neither imbalance has been fully resolved. The overlapping zone is the Balanced Price Range. It is a contested area where both buyers and sellers have unfilled orders sitting, which tends to attract significant price activity when price returns to it.
BPRs are used as pullback entry zones during trending markets. In an uptrend, a bullish BPR that forms after a strong move up can act as support when price retraces. In a downtrend, a bearish BPR that forms after a strong move down can act as resistance when price retraces.
How to Identify a Balanced Price Range (BPR)
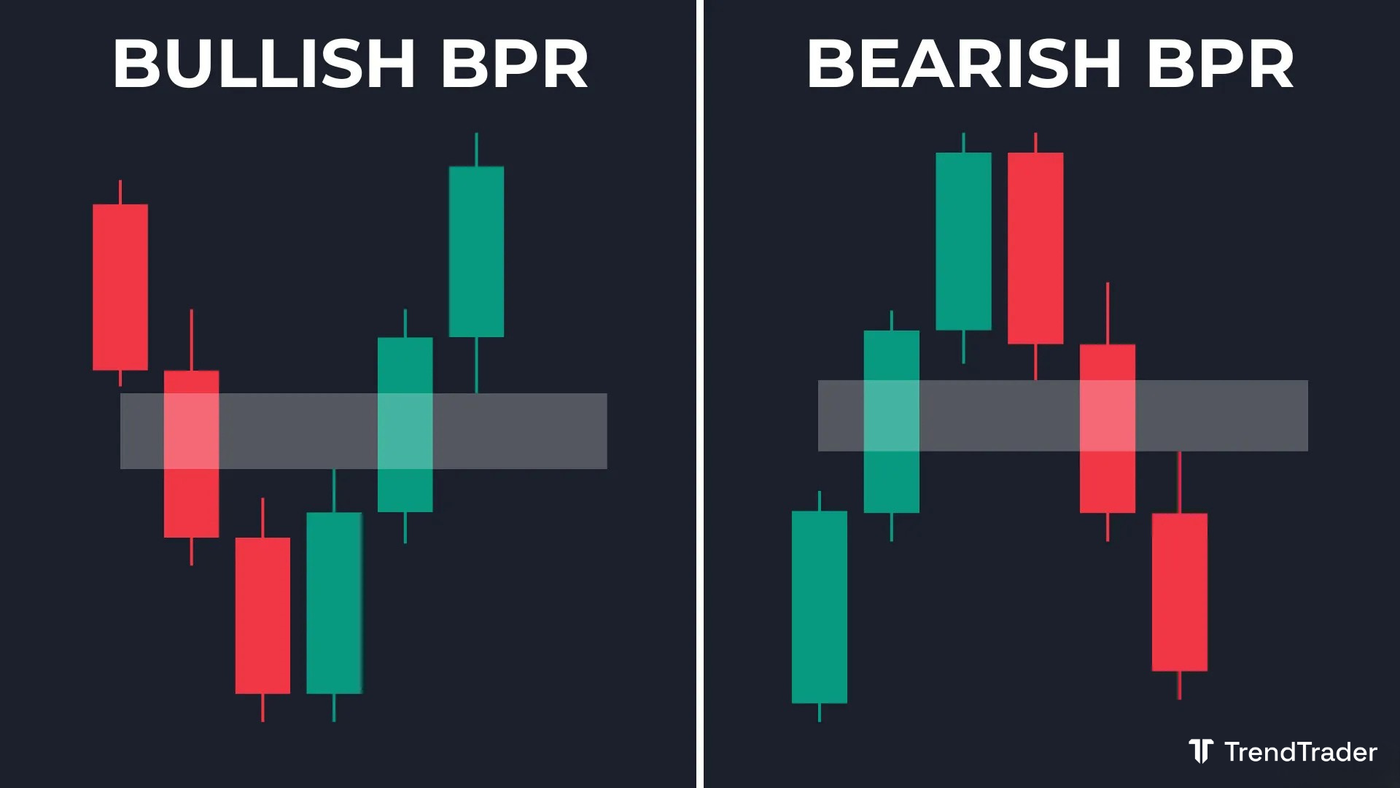
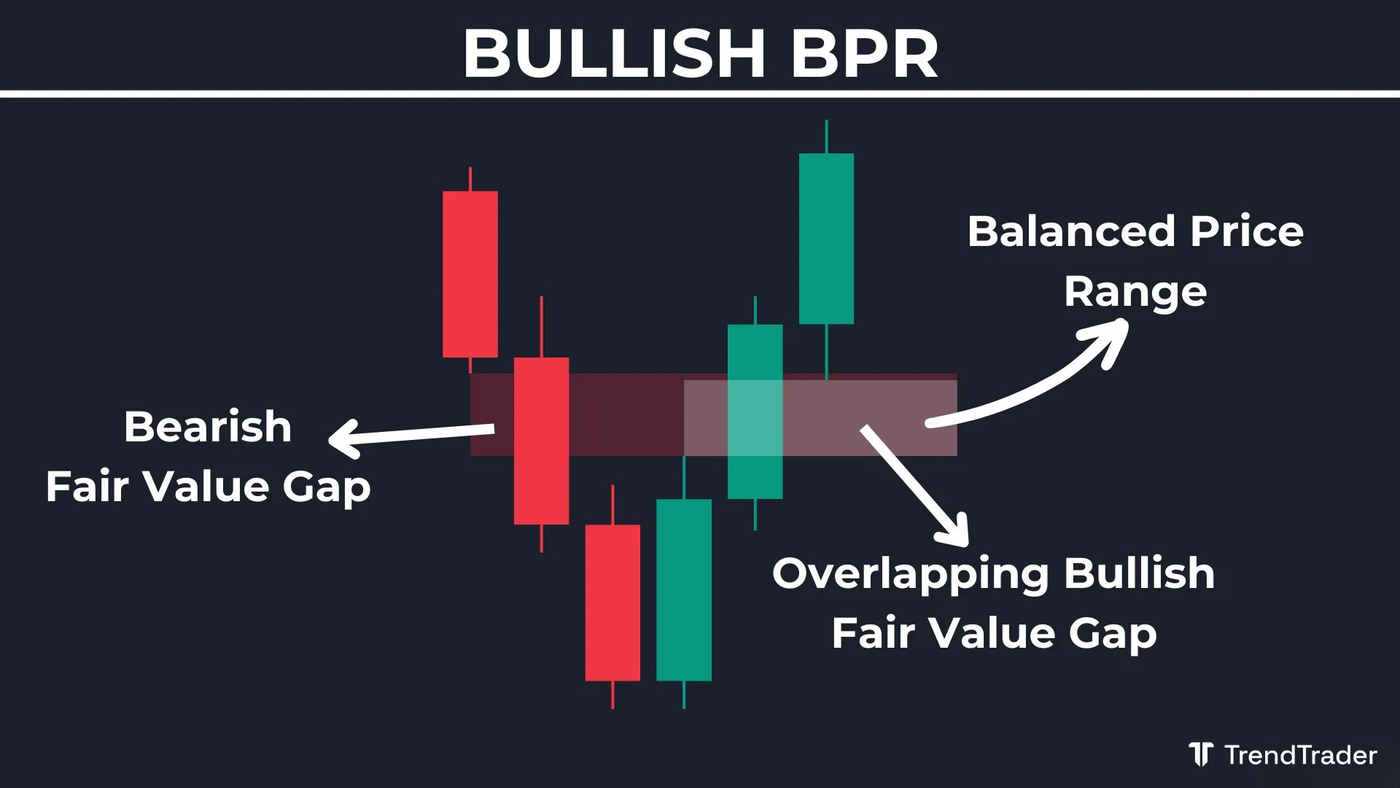
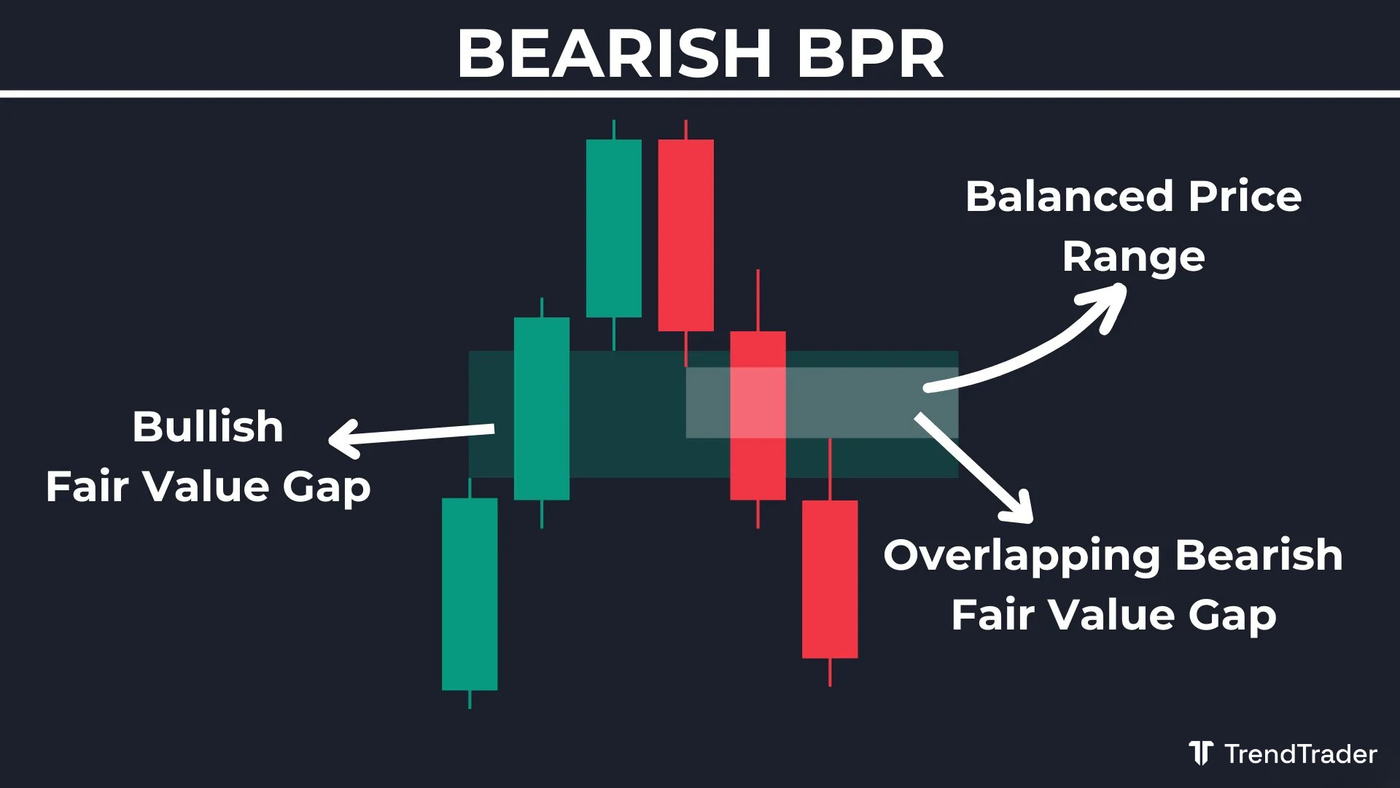
To find a BPR, look for a fair value gap that overlaps with an opposing fair value gap. The overlapping region between the two gaps is the BPR. Both gaps must actually intersect: if they are close to each other but do not overlap, no BPR exists.
How to Identify a Bullish BPR
A bullish BPR forms when a bullish FVG overlaps a bearish FVG. The bullish FVG is the gap created by a strong upward move: the space between the high of candle one and the low of candle three in a three-candle sequence. The bearish FVG is the gap created by a strong downward move. Where these two gaps intersect is the bullish BPR. When price later retraces into this zone, it represents a potential long entry.
How to Identify a Bearish BPR
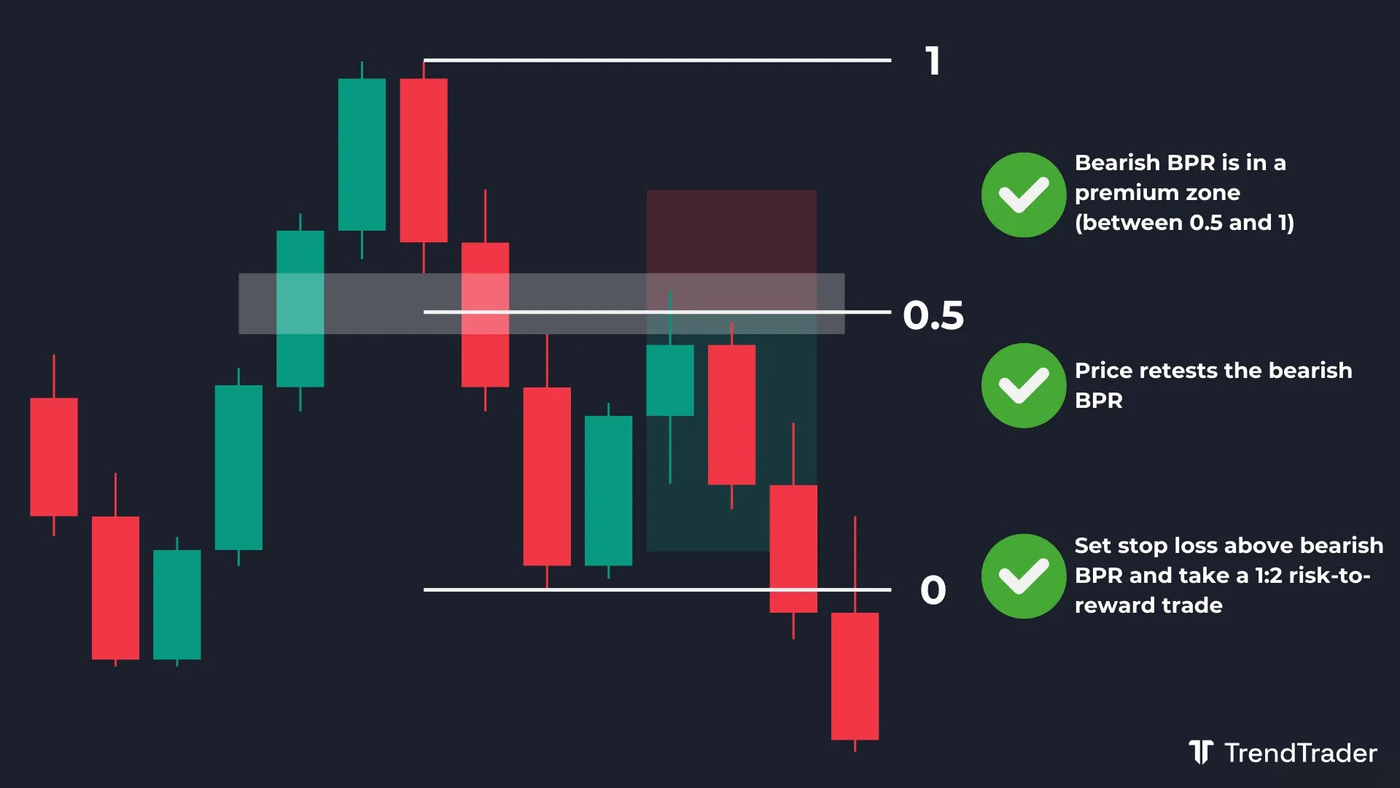
A bearish BPR forms when a bearish FVG overlaps a bullish FVG. The bearish FVG is the gap created by a strong downward move. The bullish FVG is the gap from a prior upward move. Where these two gaps intersect is the bearish BPR. When price later retraces up into this zone, it represents a potential short entry.
How to Trade a Balanced Price Range (BPR)
BPRs are pullback entry zones, not reversal signals. Use them when you already have a clear directional bias from higher timeframe structure, a liquidity sweep, or a break of structure. The BPR tells you where to enter, not which direction to trade.
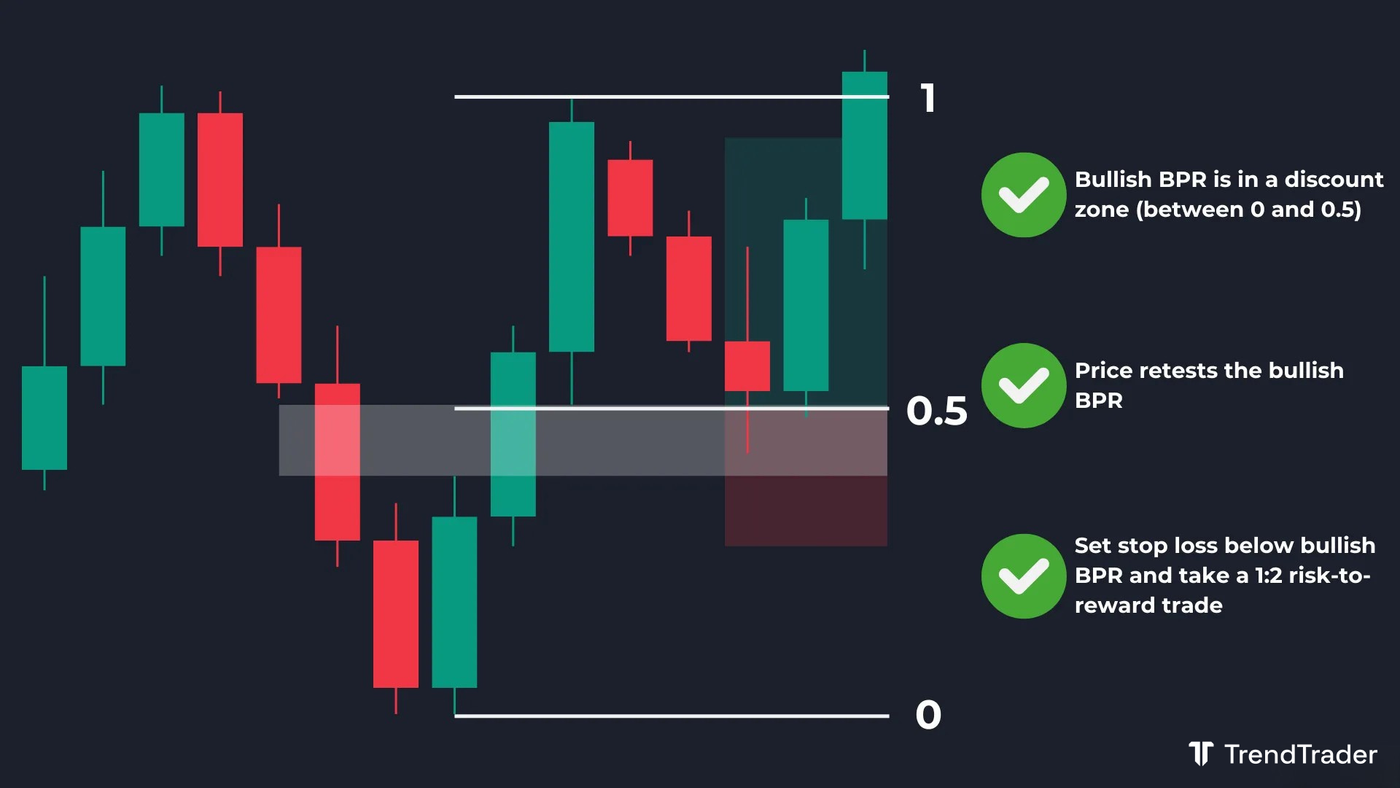
For added precision, pair BPRs with premium and discount zones. A bullish BPR inside a discount zone (below the 50% Fibonacci level of the recent swing) is a stronger long candidate than one sitting in a premium zone. A bearish BPR inside a premium zone is a stronger short candidate than one sitting in a discount zone.
BPR Long Trade Example
A bullish BPR forms during an uptrend. Price pulls back from its high and retraces into the BPR, which is sitting inside a discount zone. Enter long at the BPR, set your stop loss below the zone, and target the prior high or the next liquidity level above. A 1:2 risk-to-reward is a common initial target.
BPR Short Trade Example
A bearish BPR forms during a downtrend. Price pulls back from its low and retraces up into the BPR, which is sitting inside a premium zone. Enter short at the BPR, set your stop loss above the zone, and target the prior low or the next liquidity level below. A 1:2 risk-to-reward is a common initial target.
Balanced Price Range vs. Inversion Fair Value Gap
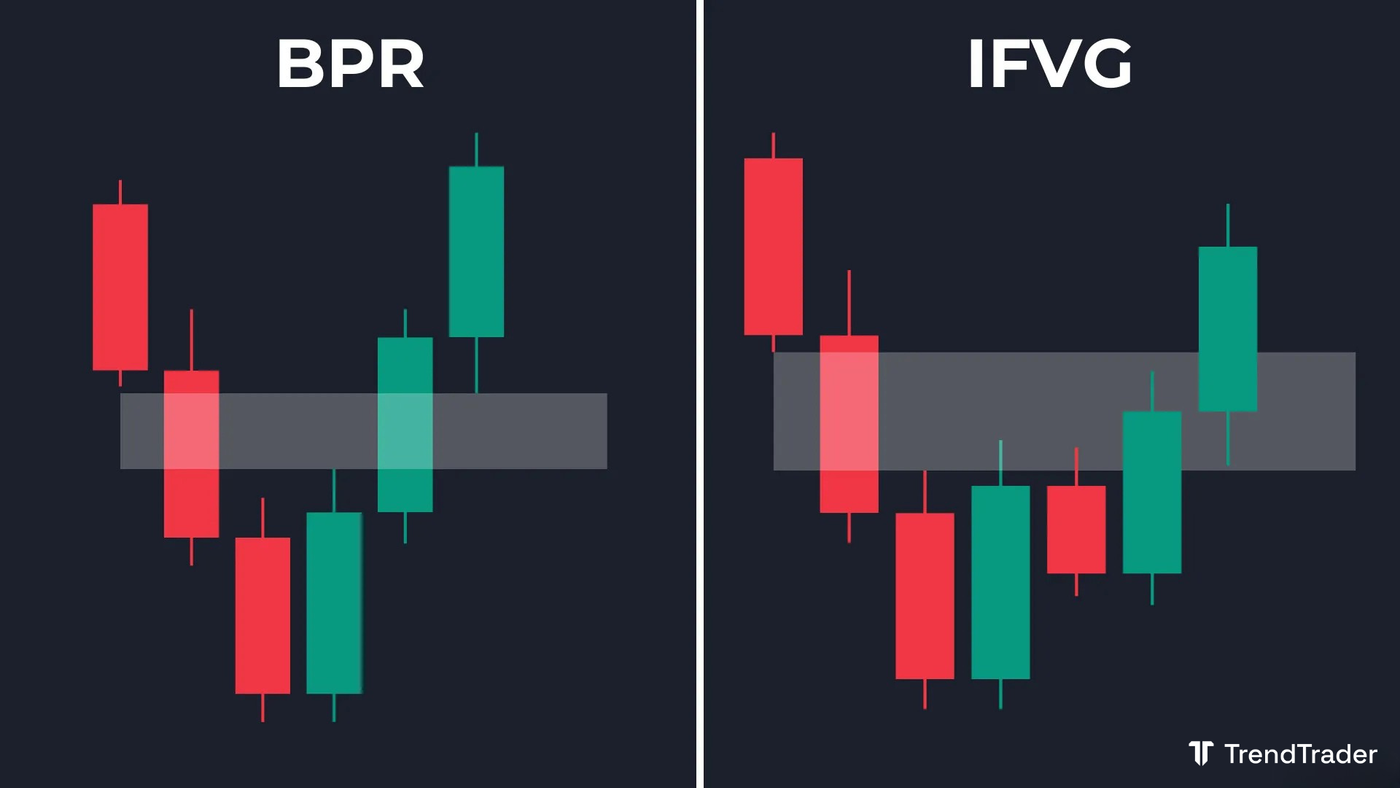
Both BPRs and inversion fair value gaps (IFVGs) involve a previously established FVG being revisited by price from the opposite side. The key distinction is in how they form.
An inversion fair value gap (IFVG) forms when an existing FVG is invalidated by price: a candle wick or close pushes through the gap, flipping its polarity. The FVG that was bullish support becomes bearish resistance, or vice versa.
A BPR forms when two opposing FVGs physically overlap, creating a zone that has been contested from both directions. The practical implication: all BPRs can be considered a type of IFVG, but not all IFVGs qualify as BPRs. A BPR requires two overlapping gaps. An IFVG requires only one gap that has been flipped.
FAQ
How do you identify a Balanced Price Range?
Find a bullish fair value gap and a bearish fair value gap on the same chart that physically overlap. The intersecting zone between the two gaps is the BPR. Mark the top and bottom of the overlap as your zone boundaries. Use this zone as a potential entry on the next pullback.
What is the difference between a Balanced Price Range and an Inversion Fair Value Gap?
An IFVG forms when a single FVG is invalidated and flips polarity. A BPR requires two opposing FVGs to overlap. Because a BPR has been tested from both directions, it tends to be a denser and more contested zone than a standard IFVG. Every BPR contains an IFVG-like characteristic, but the BPR is specifically defined by the double-gap overlap.
What timeframe does a Balanced Price Range work best on?
BPRs work on all timeframes. Higher timeframe BPRs carry more structural weight, as the overlapping FVGs represent larger imbalances created by more participants. As a practical approach, identify the BPR on a mid-to-higher timeframe for the entry zone, then use a lower timeframe to time the entry precisely within the zone. Always confirm that the higher timeframe trend supports the direction you are trading.
This article is for educational purposes only and does not constitute financial advice. Trading involves significant risk of loss. Do your own research and consult a licensed financial advisor before making any trading decisions.
Browse more trading concept guides on the TrendTrader blog.
