

Breakaway Gap Explained: What It Is and How to Identify It
A Breakaway Gap is a fair value gap that price never returns to mitigate. Learn the three price structures that signal when an FVG is likely to become a Breakaway Gap.

A Breakaway Gap is a fair value gap (FVG) that price does not return to mitigate. Instead of pulling back to fill the gap, price continues in the direction of the original move, leaving the FVG permanently unmitigated. Recognizing when an FVG is likely to become a Breakaway Gap helps you avoid waiting at levels price will never revisit and focus your attention on the structures that actually attract price on pullbacks.
What Is a Breakaway Gap?
Not every fair value gap gets mitigated. When price moves with enough conviction and leaves behind a secondary structure that absorbs any potential pullback, the original FVG is effectively bypassed. That unmitigated FVG is the Breakaway Gap.
The concept is useful because it changes how you read the chart after a strong move. Instead of marking every FVG as a potential retest zone, you can identify which gaps are shielded by other structures, eliminating them as entry candidates and directing your focus to the breaker block, inversion FVG, or balanced price range that absorbed the pullback instead.
How to Identify a Breakaway Gap
Identifying a Breakaway Gap in hindsight is straightforward: any FVG that was never retested is a Breakaway Gap. The real skill is recognizing one in real time, before the opportunity to wait at the gap has passed.
There are three price action structures that signal an FVG is likely to become a Breakaway Gap. When any one of these forms between the original FVG and where price currently sits, the structure will absorb the next pullback, leaving the FVG behind. Those three structures are: a breaker block (BB), an inversion fair value gap (IFVG), and a balanced price range (BPR).
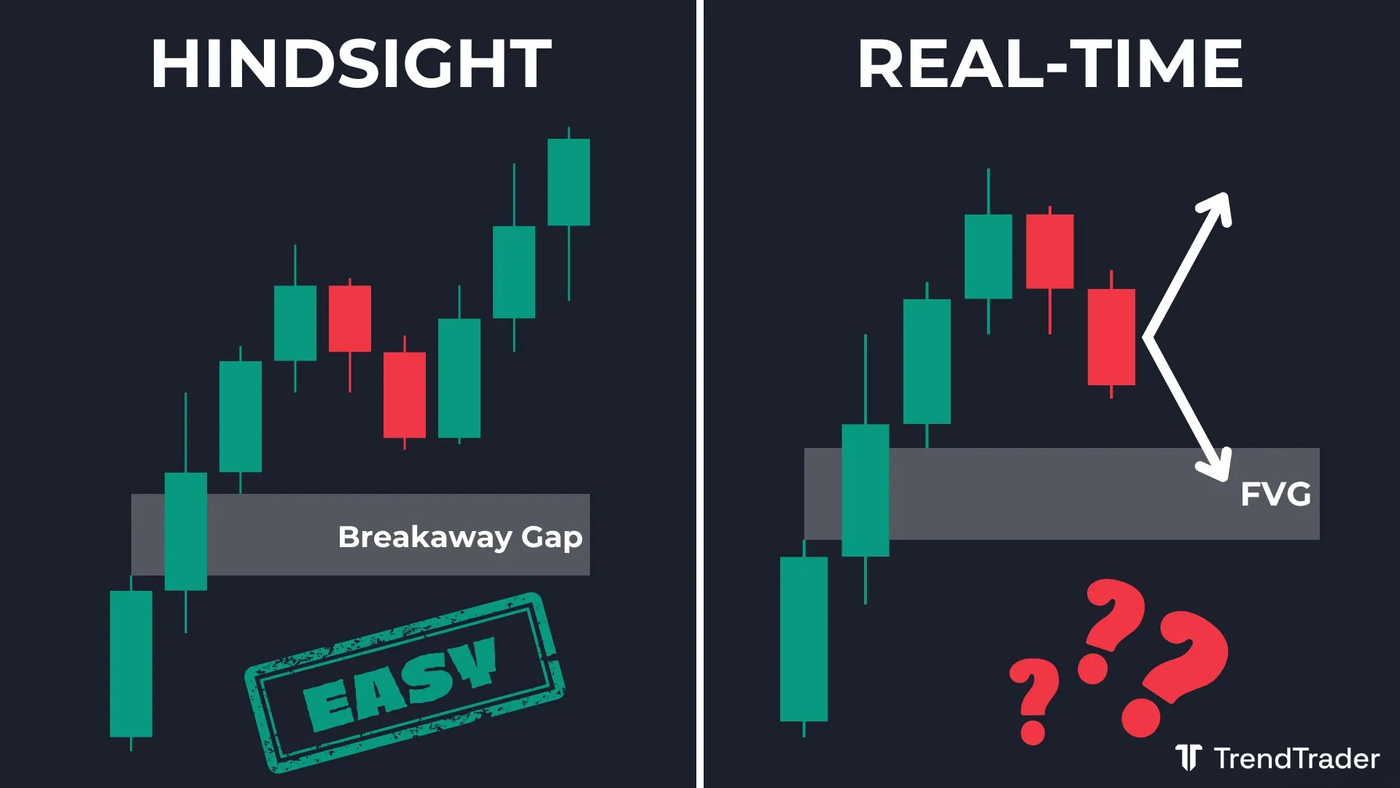
How to Identify a Bullish Breakaway Gap
After a bullish FVG forms, watch for one of three developments as price continues higher. Any of these signals the FVG is likely to become a Breakaway Gap.
Scenario 1: Bullish Breaker Block forms. Price moves higher and closes above a prior bearish order block, converting it into a bullish breaker block. That breaker block now acts as the nearest support level on any pullback. Price is likely to retest the breaker block rather than dropping all the way back to the original FVG, turning the FVG into a Breakaway Gap.
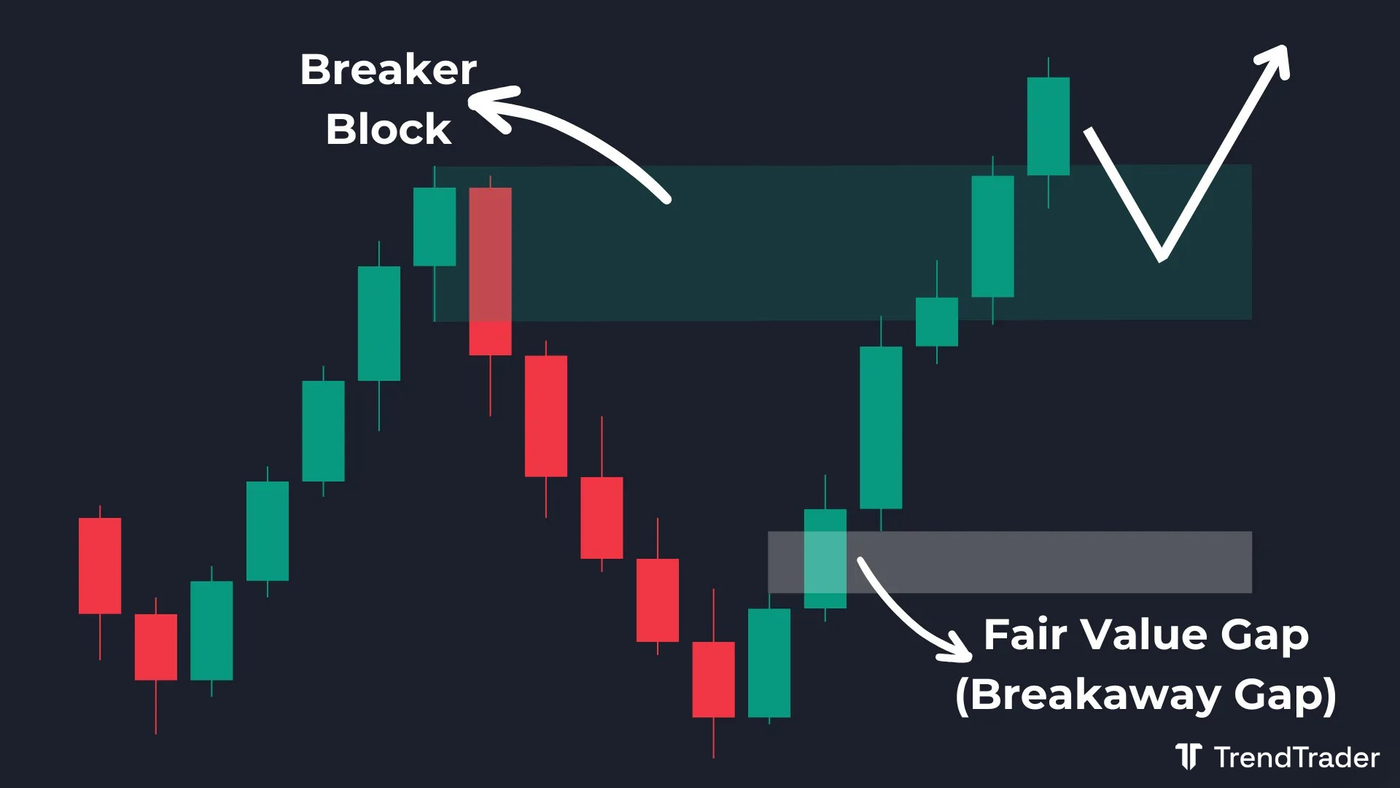
Scenario 2: Bullish Inversion Fair Value Gap forms. Price moves higher and closes above a bearish FVG, flipping it into a bullish IFVG. That IFVG now acts as a support zone on the next pullback. Price is likely to retest the IFVG rather than the original FVG below, turning the original FVG into a Breakaway Gap.
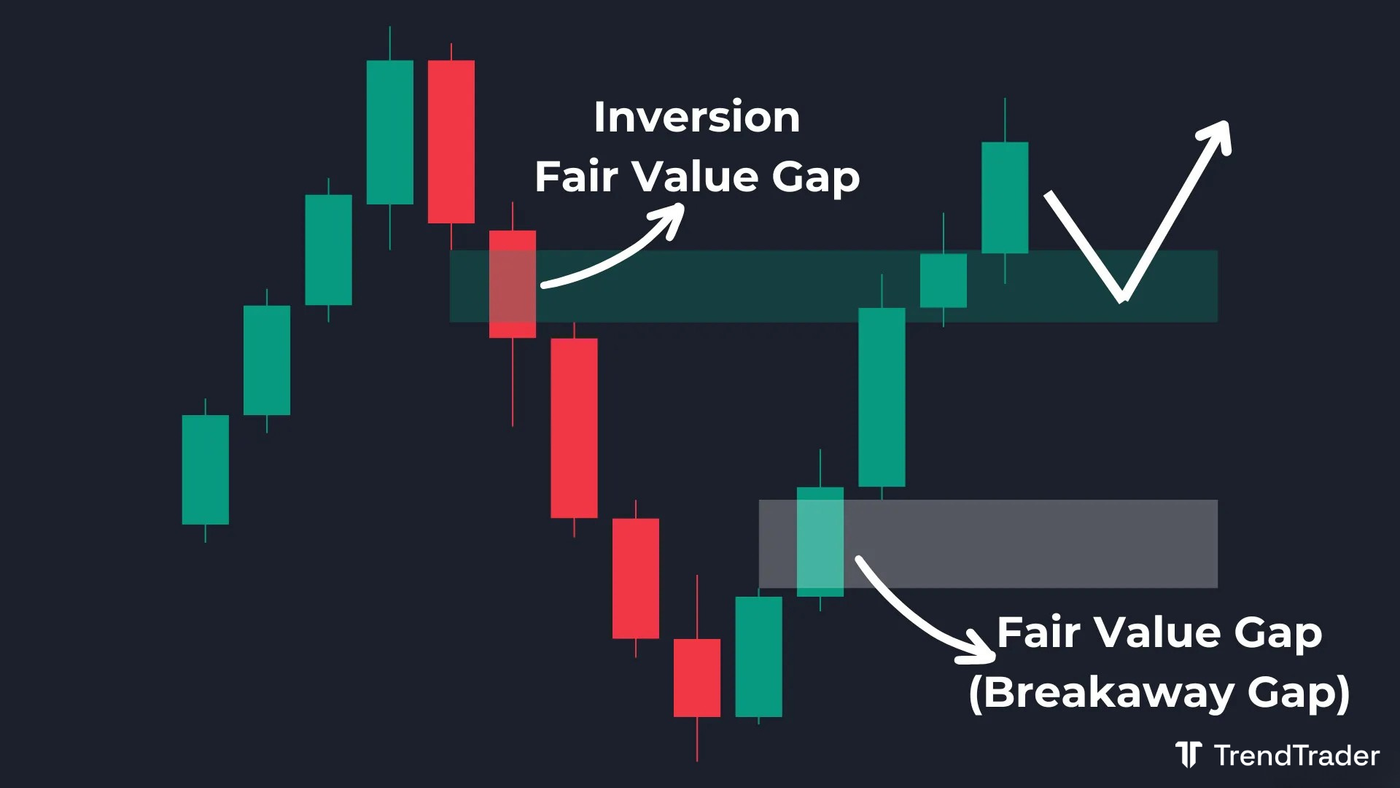
Scenario 3: Balanced Price Range forms. Price moves higher and a new bullish FVG overlaps a prior bearish FVG, creating a Balanced Price Range (BPR). The BPR acts as a strong contested support zone. On the next pullback, price is likely to hold at the BPR rather than falling to the original FVG, turning that FVG into a Breakaway Gap.
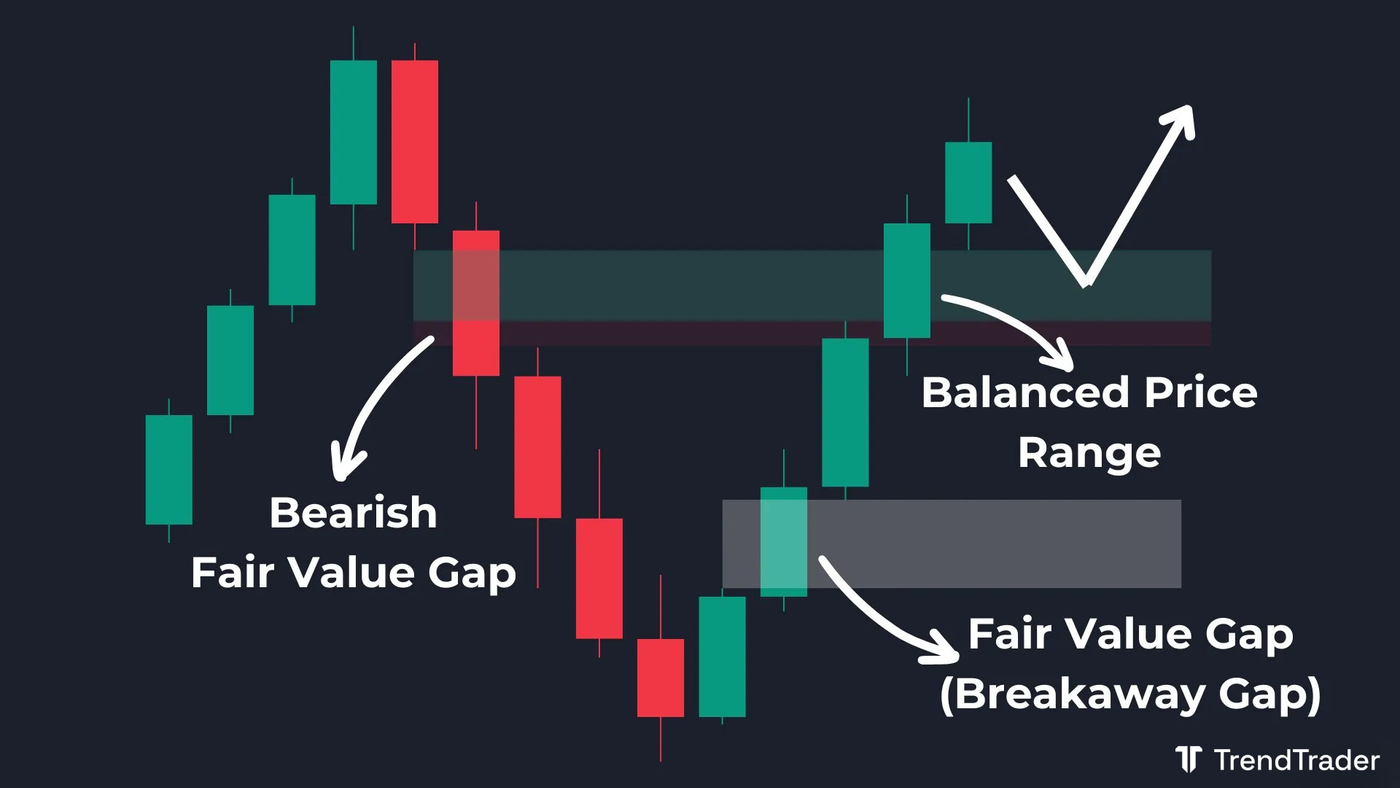
How to Identify a Bearish Breakaway Gap
After a bearish FVG forms, watch for one of three developments as price continues lower. Any of these signals the FVG is likely to become a Breakaway Gap.
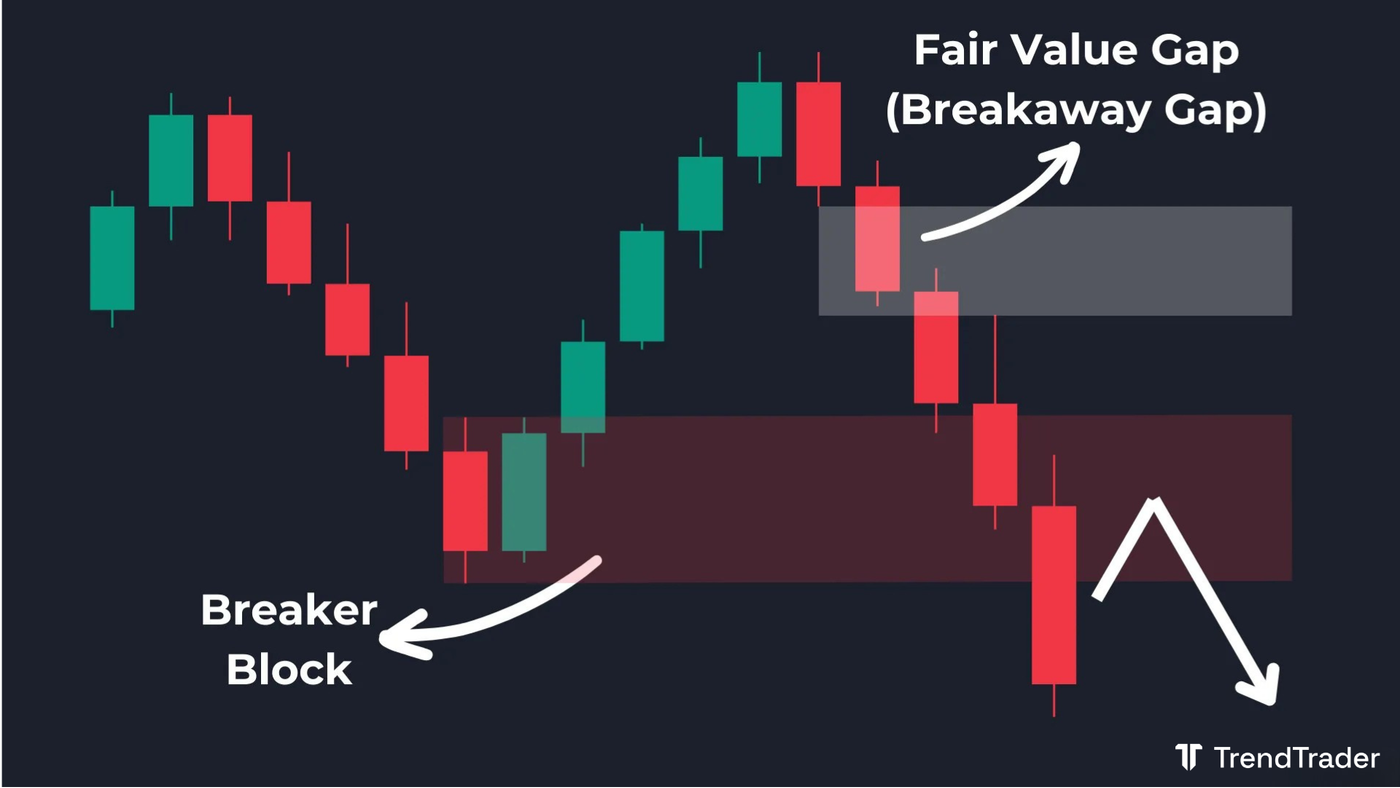
Scenario 1: Bearish Breaker Block forms. Price moves lower and closes below a prior bullish order block, converting it into a bearish breaker block. That breaker block now acts as the nearest resistance level on any pullback. Price is likely to retest the breaker block rather than rising all the way back to the original FVG above, turning the FVG into a Breakaway Gap.
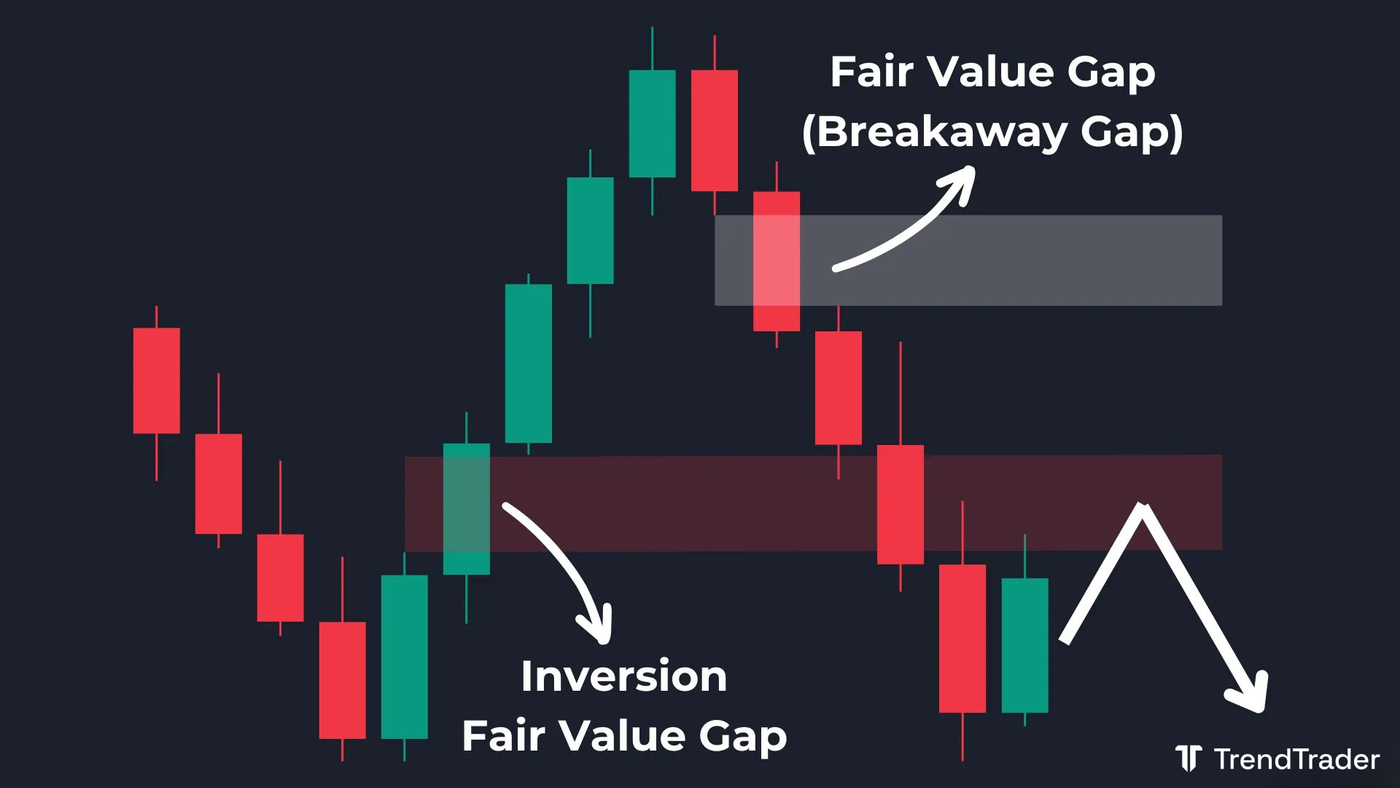
Scenario 2: Bearish Inversion Fair Value Gap forms. Price moves lower and closes below a bullish FVG, flipping it into a bearish IFVG. That IFVG now acts as a resistance zone on any pullback. Price is likely to retest the IFVG rather than the original FVG above, turning the original FVG into a Breakaway Gap.
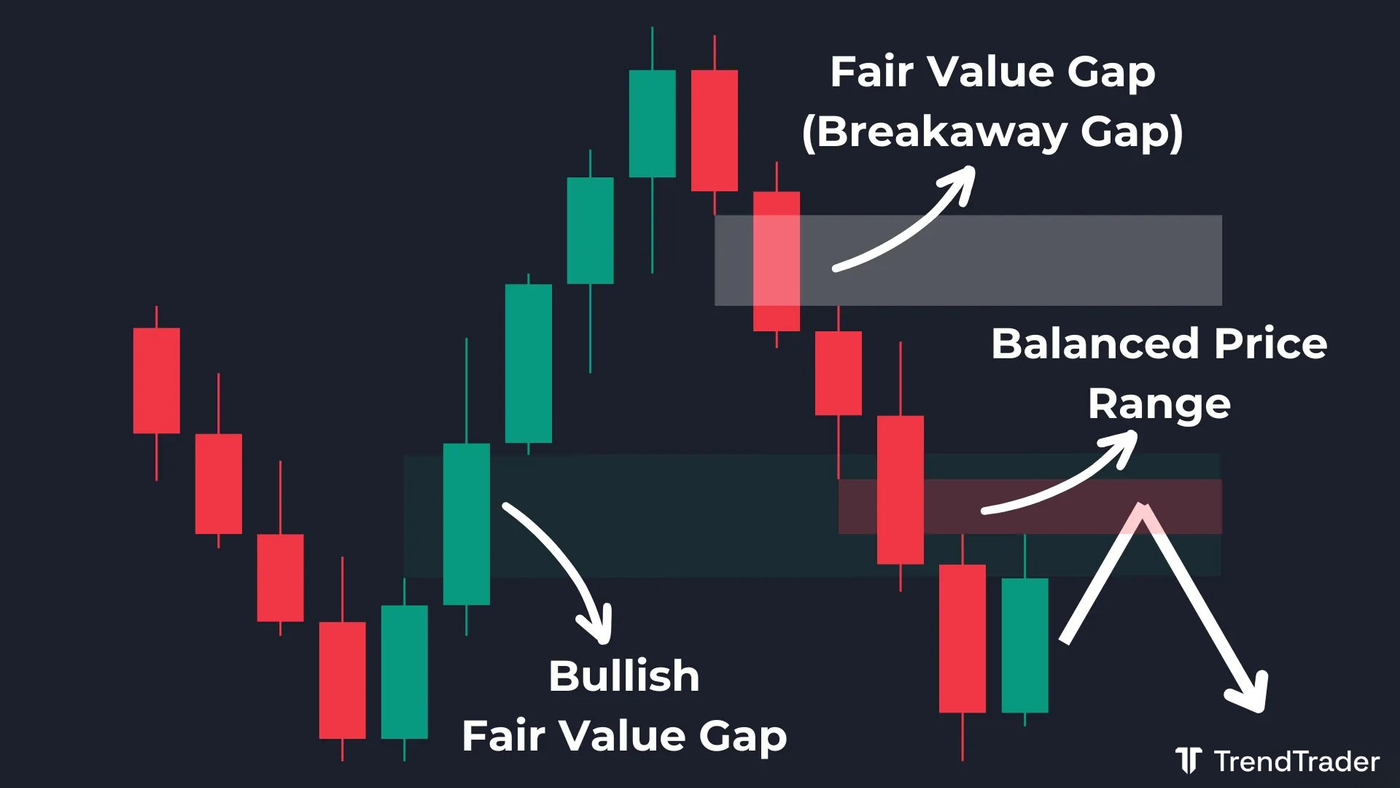
Scenario 3: Balanced Price Range forms. Price moves lower and a new bearish FVG overlaps a prior bullish FVG, creating a Balanced Price Range (BPR). The BPR acts as a strong contested resistance zone. On the next pullback, price is likely to hold at the BPR rather than rising to the original FVG, turning that FVG into a Breakaway Gap.
Should You Use a Breakaway Gap as a Trade Entry?
No. If a gap is a Breakaway Gap, by definition price is unlikely to return to it. Waiting at a Breakaway Gap for an entry means waiting at a level that will probably never be retested.
The correct approach is to use the structure that shielded the gap as your entry zone instead. The breaker block, IFVG, or BPR that turned the original FVG into a Breakaway Gap is where the actual pullback will land. Those are your entry candidates. The Breakaway Gap itself is useful as a label, not a trade location.
What Does a Breakaway Gap Signal?
A Breakaway Gap signals strong directional conviction. When price moves with enough force to leave an FVG behind and immediately forms another high-confluence structure, it indicates that the buyers or sellers driving the move are not looking back. The gap was never filled because the momentum never paused long enough.
In practical terms, a Breakaway Gap tells you where price has been but will not return. Spotting them keeps your chart clean: instead of marking every FVG as a potential entry level, you remove the ones that are shielded and focus only on the structures that are live and actionable.
FAQ
When is a Fair Value Gap considered a Breakaway Gap?
An FVG becomes a Breakaway Gap when a secondary structure forms between it and where price currently sits. The three structures that shield an FVG this way are: a breaker block (price closes beyond a prior order block), an inversion fair value gap (price closes through an opposing FVG, flipping it), or a balanced price range (two opposing FVGs overlap). Once any of these forms, the original FVG is unlikely to be retested.
How is a Breakaway Gap different from a regular unmitigated FVG?
Every Breakaway Gap is an unmitigated FVG, but not every unmitigated FVG is a Breakaway Gap. An unmitigated FVG is simply one that has not been retested yet. A Breakaway Gap is specifically one where a shielding structure (BB, IFVG, or BPR) has formed, making it unlikely the gap will ever be mitigated. The label is about what the gap will do, not just what it has done so far.
Can you trade the structure that creates a Breakaway Gap?
Yes. The breaker block, IFVG, or BPR that shields the original FVG is exactly the structure to trade. When price pulls back into one of those zones, that is your entry. The Breakaway Gap behind it tells you the momentum is strong and that the pullback is likely to be shallow, which supports a higher probability that your entry zone holds.
This article is for educational purposes only and does not constitute financial advice. Trading involves significant risk of loss. Do your own research and consult a licensed financial advisor before making any trading decisions.
Browse the full TrendTrader glossary of trading concepts on the TrendTrader blog.
