

Propulsion Blocks Explained: How to Identify and Trade Them
A propulsion block is an order block that forms after price reacts off a previous order block. Learn how to identify bullish and bearish propulsion blocks and trade them effectively.

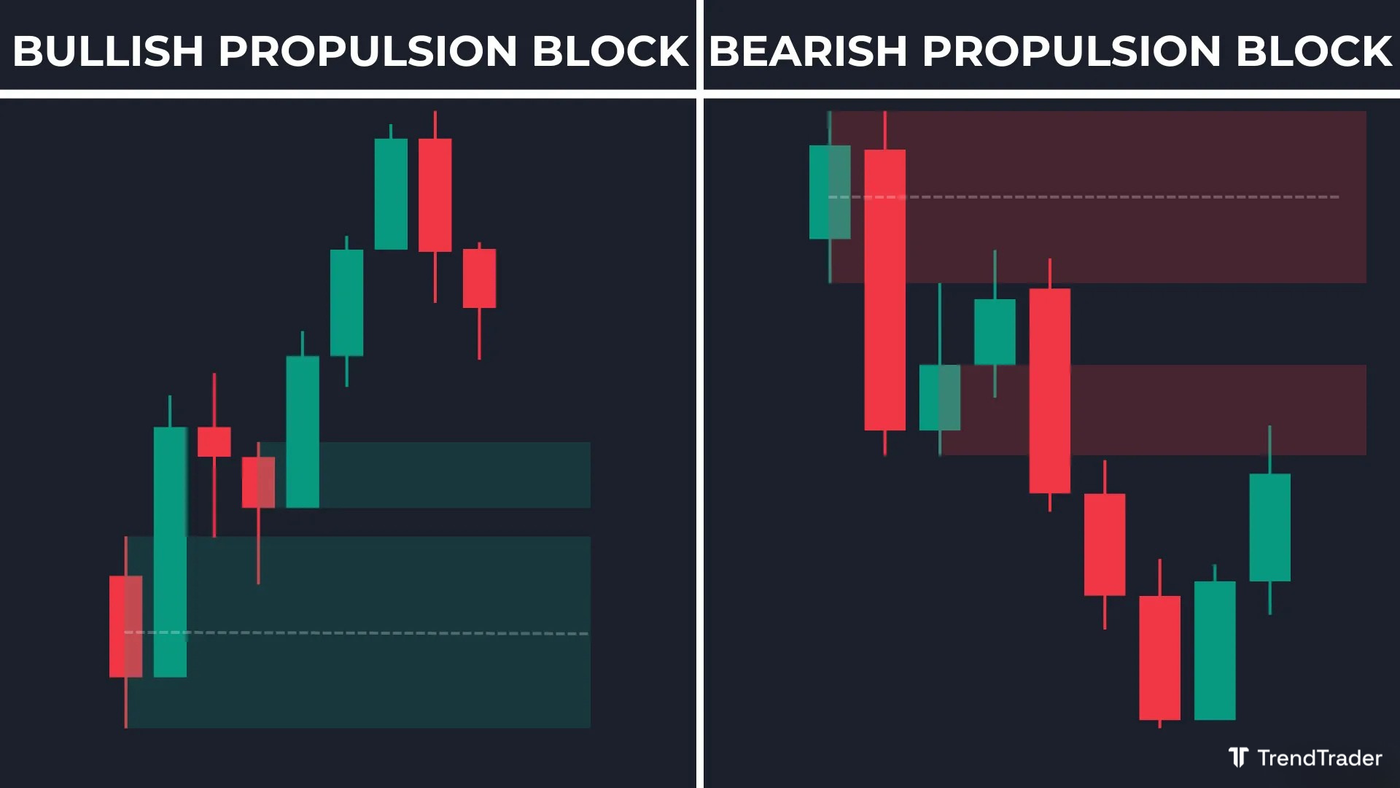
A propulsion block is a specific type of order block that forms when price retests an existing order block, holds above or below its 50% midpoint, and then launches sharply in the original direction. That reaction candle becomes a new order block, and because of how it was formed, it carries extra weight as a potential support or resistance level on future retests.
To understand propulsion blocks, you first need a solid grasp of how order blocks work: what they are, how they form, and why price tends to react at them.
What Are Propulsion Blocks?
Propulsion blocks are order blocks that were created from a reaction off a previous order block. They mark areas where price has twice confirmed a significant level: once when the original order block held, and again when the reaction candle off that block formed a new zone.
Because these zones have been validated by two separate price reactions at the same area of interest, many SMC traders treat them as higher-conviction zones than a standard order block. When price returns to a propulsion block, it is approaching an area with a double layer of structural significance.
How to Identify Propulsion Blocks
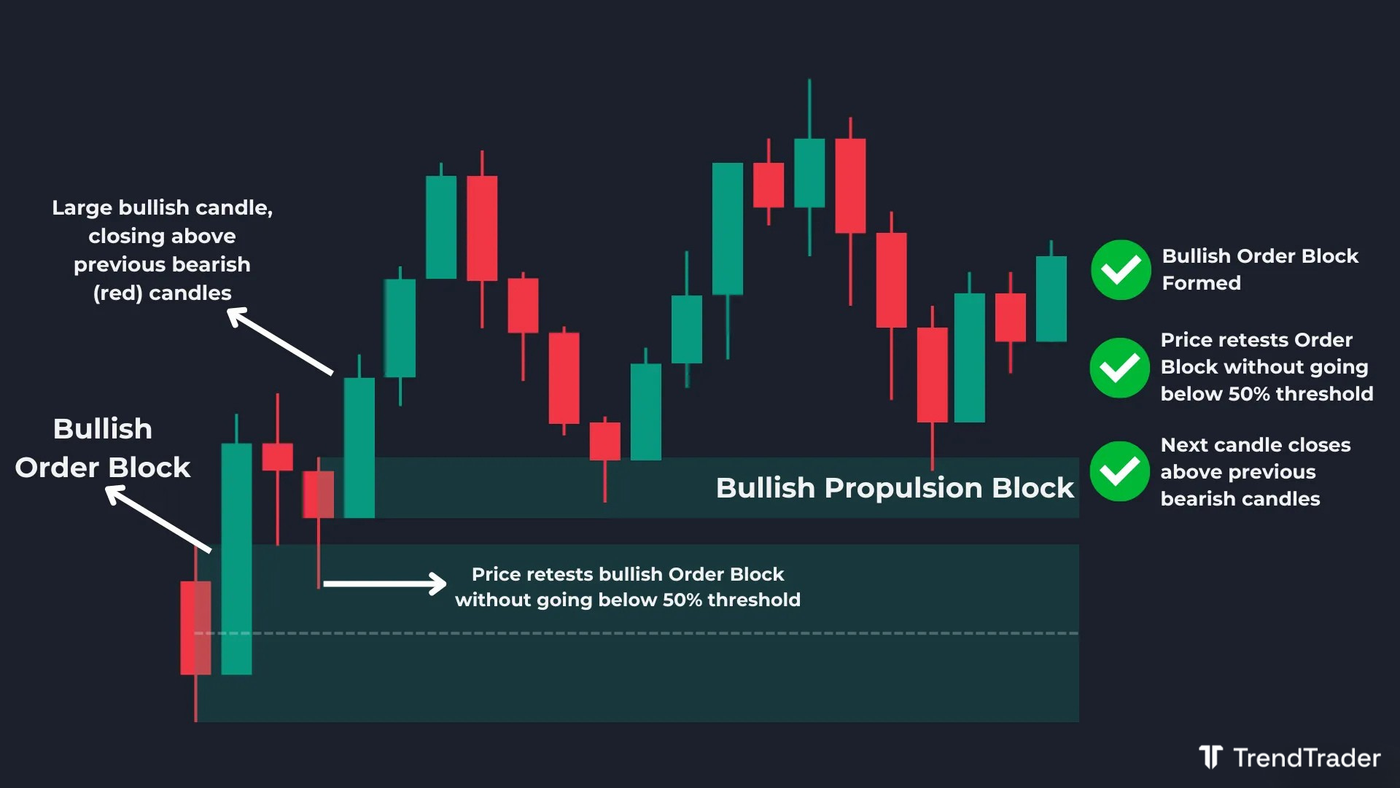
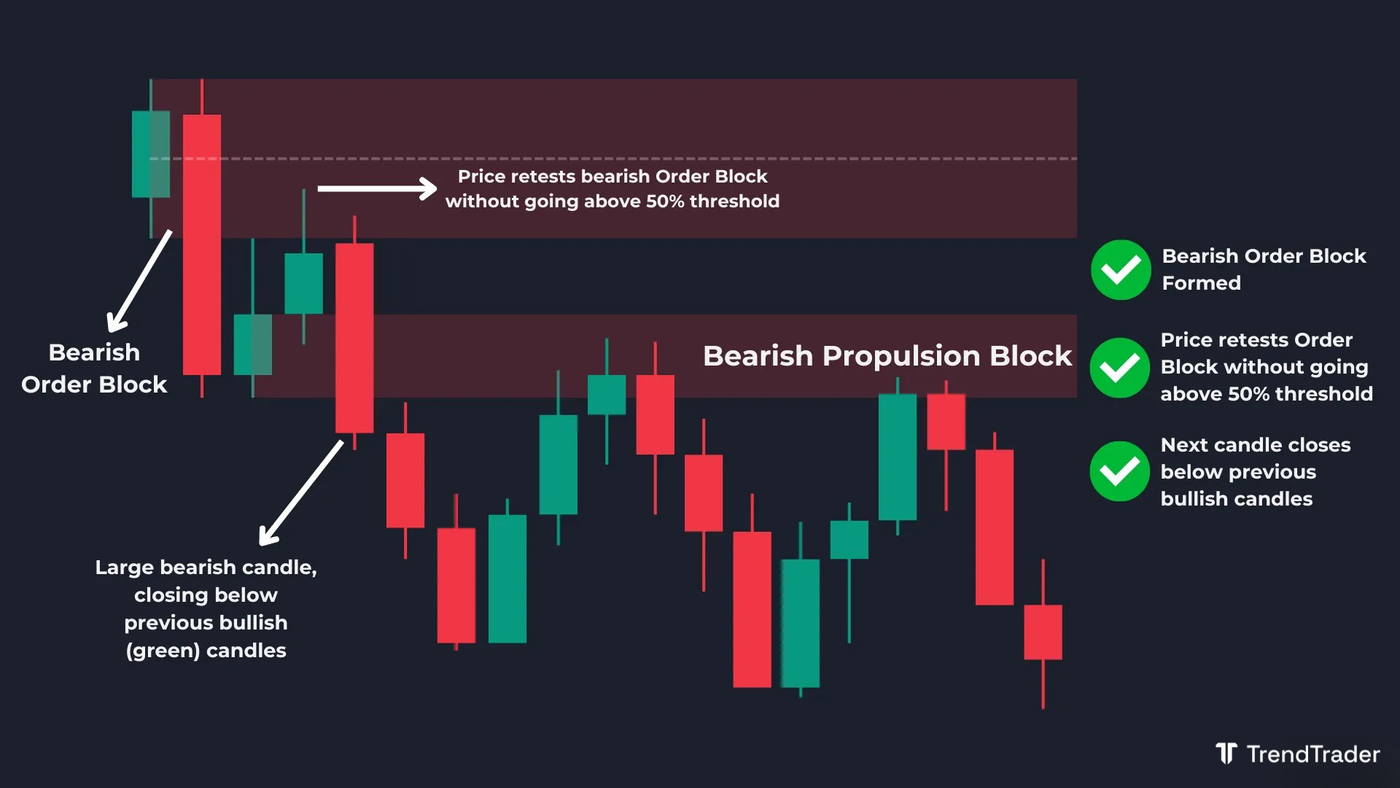
Start by marking order blocks on your chart. Then watch how price behaves when it retests those zones. The critical rule: when price retests the order block, it must not penetrate beyond the 50% midpoint of the zone. If it does, the zone is considered broken and no propulsion block forms.
When price retests the order block, respects the 50% level, and then launches sharply away, closing above the preceding bearish candles (for a bullish setup) or below the preceding bullish candles (for a bearish setup), that reaction candle becomes the propulsion block. Mark it as your new zone of interest.
How to Identify a Bullish Propulsion Block
First, identify a bullish order block: the last bearish candle before a strong impulsive move higher. Wait for price to pull back and retest that zone. The retest must hold above the 50% midpoint of the order block. When a candle retests the zone and then closes strongly above the preceding bearish candles that approached it, the propulsion block has formed. That candle is now your bullish propulsion block. Watch for price to return to it as a potential long entry zone.
How to Identify a Bearish Propulsion Block
First, identify a bearish order block: the last bullish candle before a strong impulsive move lower. Wait for price to pull back and retest that zone. The retest must hold below the 50% midpoint of the order block. When a candle retests the zone and then closes strongly below the preceding bullish candles that approached it, the propulsion block has formed. That candle is now your bearish propulsion block. Watch for price to return to it as a potential short entry zone.
How to Trade With Propulsion Blocks
Propulsion blocks work as a zone of interest, not a standalone entry trigger. When price returns to a propulsion block, you need additional confirmation before entering. Pairing them with liquidity grabs, fair value gaps, or a momentum indicator to time the entry reduces the risk of entering during a full breakdown of the zone.
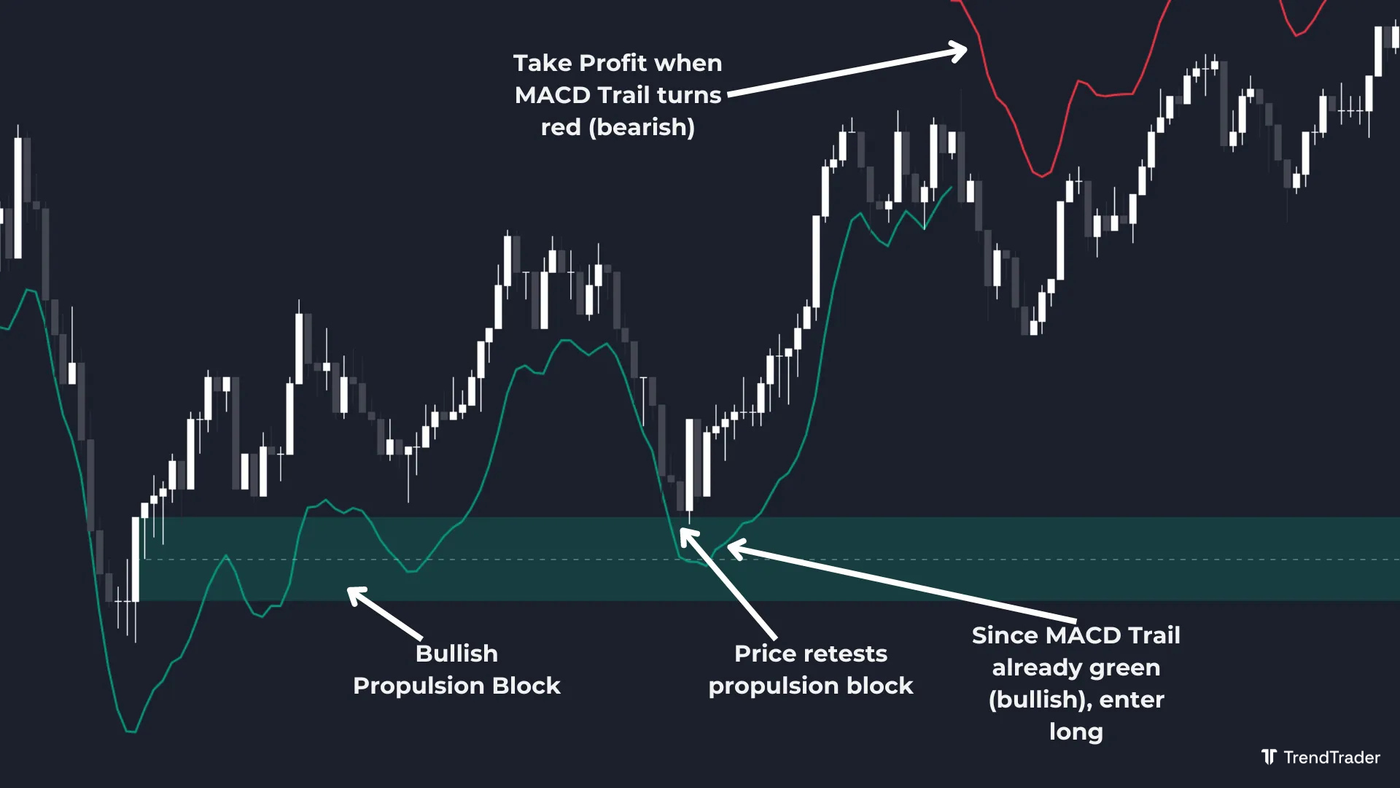
The cleanest approach is to wait for price to reach the propulsion block and then use a momentum signal such as a MACD crossover on a lower timeframe to confirm that buyers or sellers have stepped in. This keeps you from entering purely on the zone touch and adds a timing component to the trade.
Long Trade Example
A bullish propulsion block forms after price retests a bullish order block, holds above its midpoint, and closes sharply higher. When price later pulls back into the propulsion block, wait for a bullish momentum signal on a lower timeframe, such as a MACD line crossing above the signal line. Enter long once the signal fires, place your stop loss below the propulsion block, and hold until momentum shifts or a target level is reached.
Short Trade Example
A bearish propulsion block forms after price retests a bearish order block, holds below its midpoint, and closes sharply lower. When price later retraces up into the propulsion block, wait for a bearish momentum signal on a lower timeframe, such as a MACD line crossing below the signal line. Enter short once the signal fires, place your stop loss above the propulsion block, and hold until momentum shifts or a target level is reached.
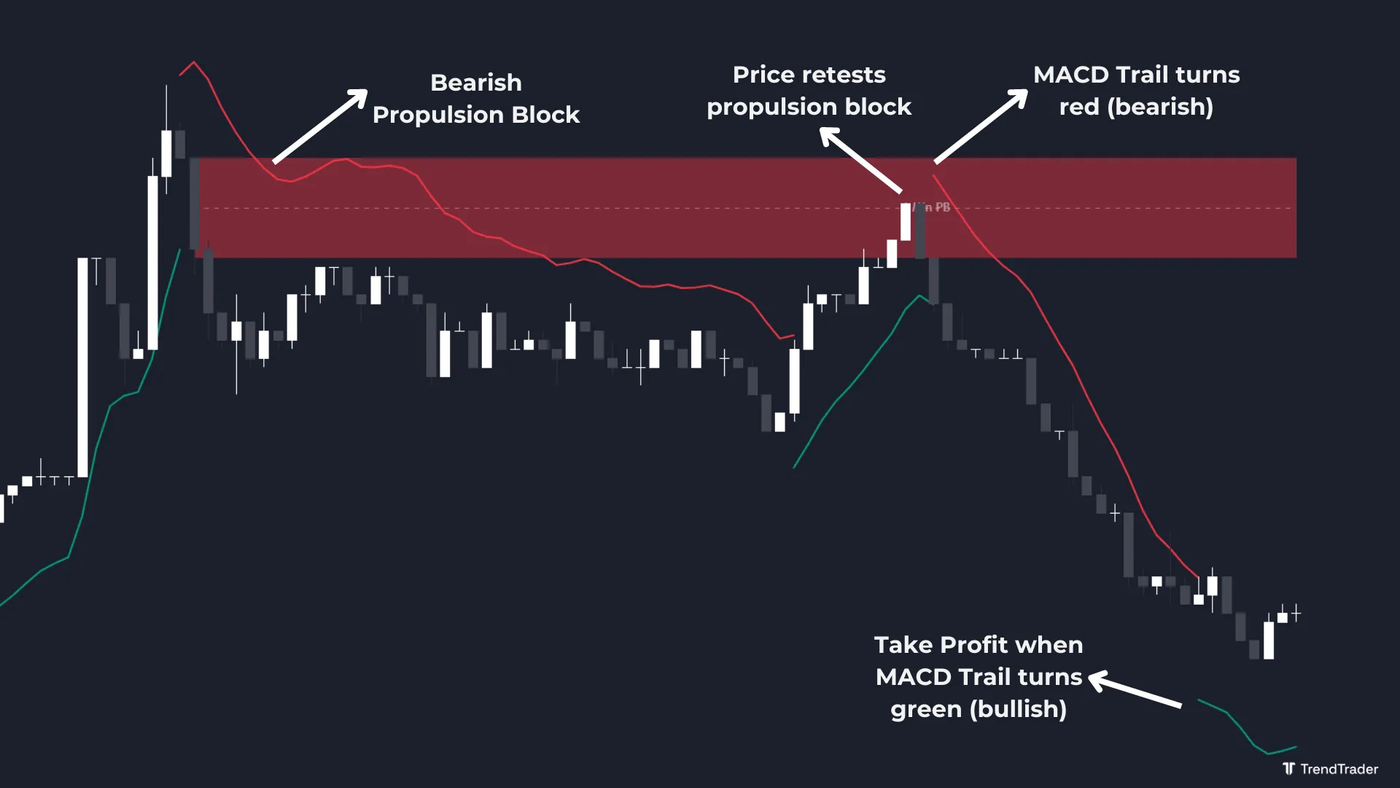
How Are Propulsion Blocks Formed?
The formation sequence is: an order block exists on the chart, price retests it without crossing the 50% midpoint, and then a strong reaction candle closes decisively beyond the approaching candles in the original direction. That reaction candle is the propulsion block. Its formation confirms that the original order block level is still defended and that momentum has accelerated off it.
What Timeframe Do Propulsion Blocks Work Best On?
Propulsion blocks form on all timeframes. They tend to appear more frequently on shorter timeframes such as the one-minute and five-minute charts, which makes them particularly relevant for scalpers and day traders.
For swing traders, higher timeframe propulsion blocks carry more structural weight. A propulsion block on the four-hour or daily chart has been seen and traded by more participants than one on the five-minute chart, which generally makes the reaction at those levels more significant.
Should You Trade Propulsion Blocks Alone?
No. Like any SMC concept, propulsion blocks need confluence to be tradeable with confidence. The zone tells you where to look, not when to enter. Pair them with a directional bias from a liquidity grab or break of structure, an entry trigger from a fair value gap or momentum signal, and a clear invalidation level (the bottom of the zone for longs, the top for shorts). Used in combination, they become a precise and structured entry tool.
This article is for educational purposes only and does not constitute financial advice. Trading involves significant risk of loss. Do your own research and consult a licensed financial advisor before making any trading decisions.
Browse more trading concept guides on the TrendTrader blog.
